If you use Ubuntu, at some point you may be curious what your kernel version is. Unfortunately, in Ubuntu, the developers don’t tell you how to check the kernel info. In this guide, we’ll show you 4 ways you can check your kernel version on Ubuntu.
Method 1 – Uname
The best and quickest way to check the kernel version on Ubuntu is with the uname command. This tool can tell you your exact kernel release version, and a lot of other valuable information as well.
To use the uname command, you must open up a terminal window on the Ubuntu desktop. To open up a terminal window on the desktop press Ctrl + Alt + T on the keyboard. Alternatively, search for “Terminal” in the app menu and open it that way.
Once the terminal window is open, execute the uname -a command. This command will print out all system information, including your kernel version information.
uname -a
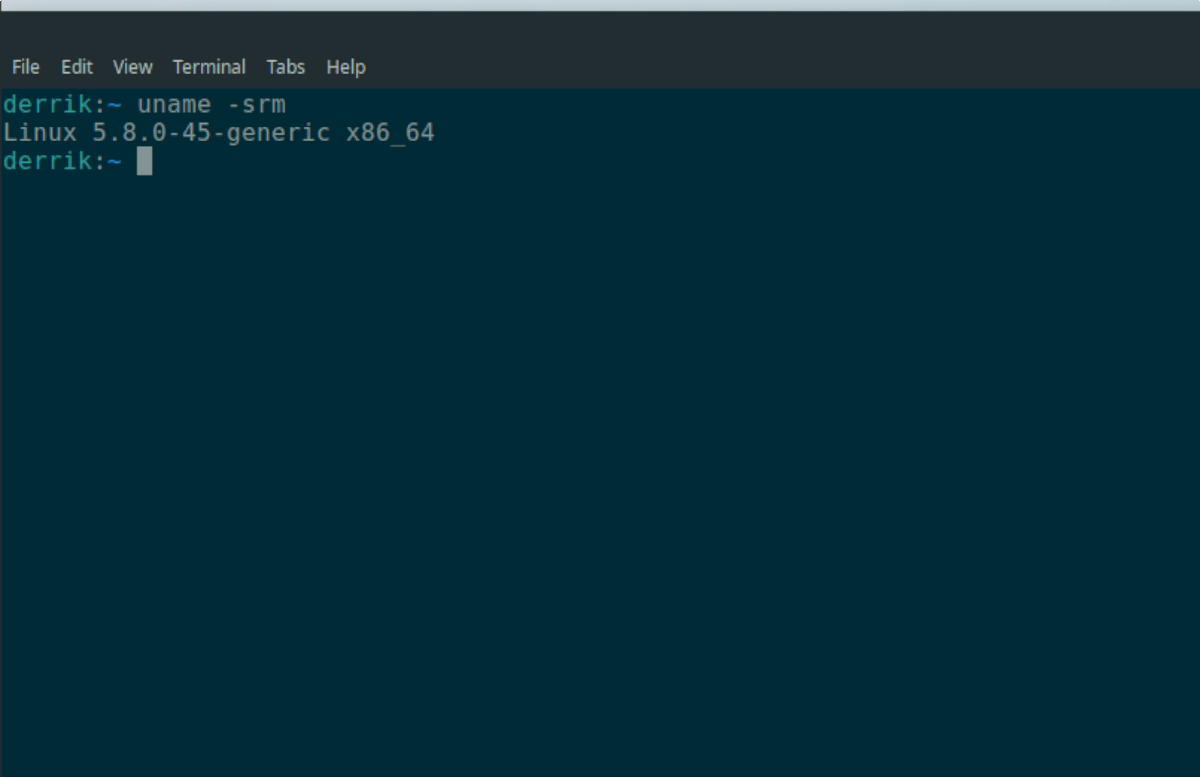
If you’d prefer to just get the kernel information, instead of the kernel information, plus OS release name, and other information, you can replace the uname -a command for the uname -srm command. This command will only show you Ubuntu’s kernel version.
uname -srm
Save output
Want to save the output of uname -srm to a text file for later? Here’s how to do it. Re-run the uname -srm command but with the > symbol on the end, and point it to a new text file.
uname -srm > ~/kernel-info.txt
When the command is complete, you can take a look at the text file at any time for information on the Ubuntu kernel by making use of the cat command below.
Note: you can also open up the “kernel-info.txt” in your favorite text editor to view the information instead of cat.
cat ~/kernel-info.txt
Method 2 – Hostnamectl
Another way to find the Ubuntu kernel version is with the Hostnamectltool. It’s a systemd tool that allows users to find information about the system. It can be used to view your Ubuntu kernel version. Here’s how.
To view your kernel information, execute the hostnamectl status command. By executing this command, the Hostnamectl program will show you a complete readout of the hostname of your system, Operating System name, kernel info, etc.
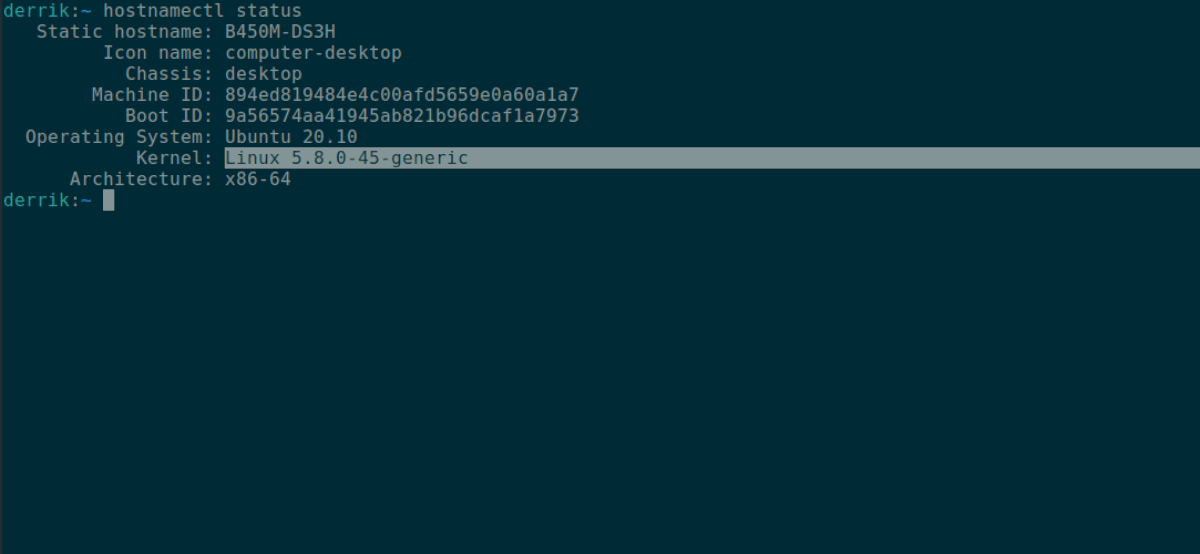
hostnamectl status
Look through the Hostnamectl output for the “Kernel” section. Once you’ve found it, the information next to it is the Ubuntu kernel information.
Don’t want to look at other information in Hostnamectl aside from the kernel version info? Use the grep command to filter out your kernel info.
hostnamectl status | grep "Kernel:"
Save output
If you’d like to save the Hostnamectl output to a text file to read later, you can do it by redirecting the command to a text file. To save the entire Hostnamectl output to a text file, execute the command below.
hostnamectl status > ~/kernel-info.txt
Alternatively, if you’d like to save just the kernel section of the output, you can do so by entering the following command.
hostnamectl status | grep "Kernel:" > ~/kernel-info.txt
To view the kernel-info.txt file, execute the cat command below. Or, open up “kernel-info.txt” in your favorite GUI text editor.
cat ~/kernel-info.txt
Method 3 – /proc/version
The third way of viewing kernel information on Ubuntu is with the /proc/version file. This file has tons of info to look at. To take a look at it, you’ll need to use the cat command below.
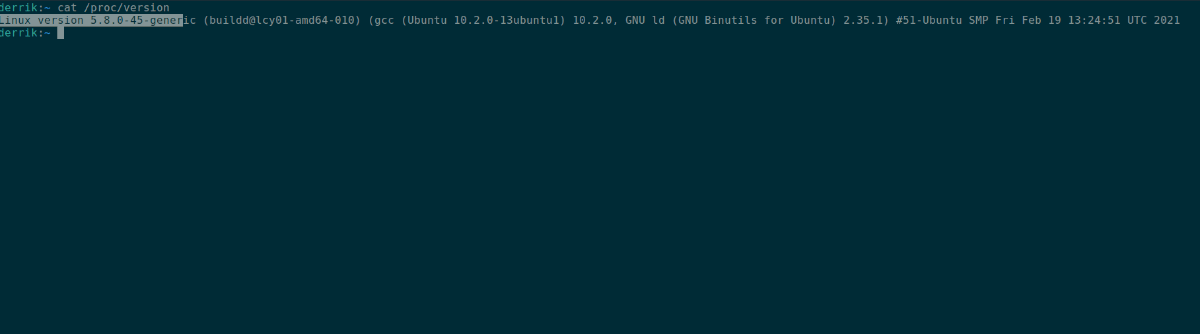
cat /proc/version
In the cat output, locate “Linux version.” Next to the “Linux version” section of the text file is your Ubuntu kernel version.
Save output
To save the output of /proc/version to a text file for later, redirect the cat /proc/version command to a text file in your home folder.
cat /proc/version > ~/kernel-info.txt
To read the text file, use the cat command on “kernel-info.txt”, or open up “kernel-info.txt” in your favorite GUI text editor.
Method 4 – Neofetch
The fourth way of viewing kernel information on Ubuntu Linux is with the Neofetch system information tool. It’s a powerful tool that scans your Ubuntu system for tons of information and prints it out in a nice output, next to your OS logo.
To get started with Neofetch, you must install the program on your computer. To install it, open up a terminal window by pressing Ctrl + Alt + T on the keyboard. Then, enter the command below.
sudo apt install neofetch
Once the Neofetch application is installed on your Ubuntu PC, execute the neofetch command in a terminal. Keep in mind that the output may take a couple of seconds, as the program needs to collect the information.
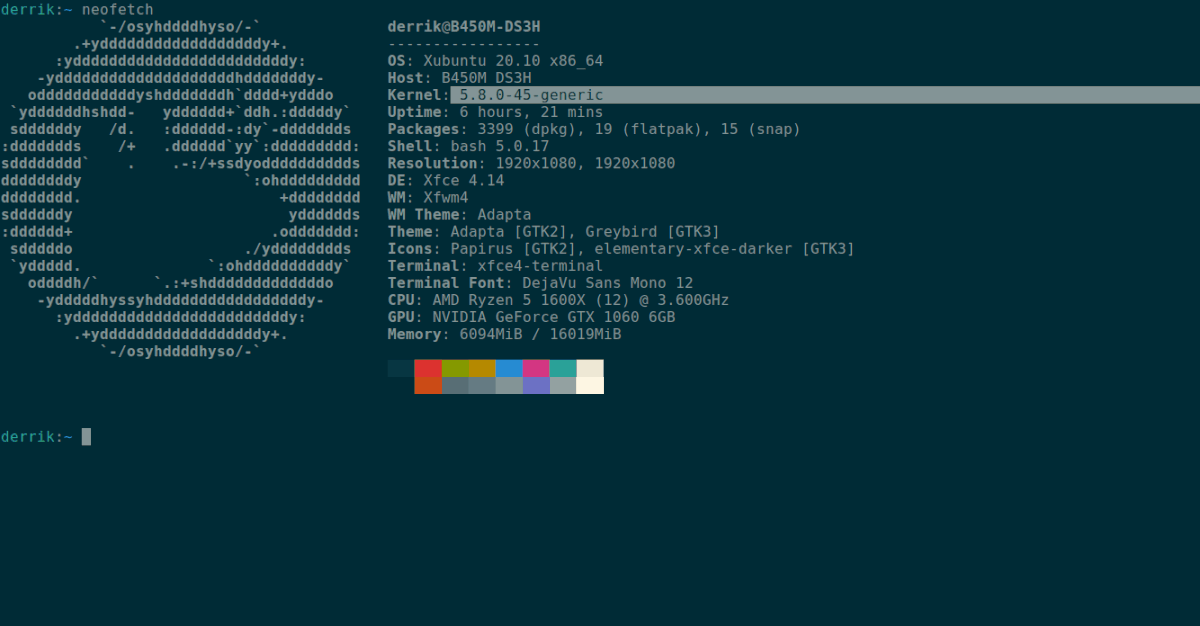
neofetch
After executing the neofetch command, look through the output for the “Kernel” section. Next to “Kernel,” you’ll see your Ubuntu kernel version.
Save output
If you’d like to save the Neofetch terminal output to a text file to read for later, generate the output but this time, redirect it to a text file rather than allowing it to print on the screen.
neofetch > ~/kernel-info.txt
You can view the Neofetch output in the “kernel-info.txt” text file at any time by executing the cat command below, or, by opening it up in your favorite text editor.
cat ~/kernel-info.txt