MySQL Workbench is a cross-platform visual tool that allows users to manage SQL databases and SQL development. In this guide, we’ll show you how to get the MySQL Workbench tool up and running on Ubuntu Linux.
Downloading MySQL Workbench on Ubuntu
MySQL Workbench is available for all recent versions of Ubuntu. Primarily, the software is targeted at LTS releases. However, it is possible to get it working on any release of Ubuntu, as the packages are updated regularly.
To download the latest MySQL Workbench software on Ubuntu, you’ll need to visit their website. Unfortunately, it isn’t possible to download directly from the command line due to the MySQL website.
To download the latest MySQL Workbench to your Ubuntu PC, follow the instructions down below that correspond to the release of Ubuntu you are currently using.
Note: MySQL Workbench and working on Ubuntu should also work on any Linux OS based upon Ubuntu. Users should also be able to get the app working on Debian and OSes based upon Debian.
Ubuntu 20.10
To download MySQL Workbench on Ubuntu 20.10, head over to the workbench website. Once on the website, find the “Select Operating System” drop-down menu. Set this menu to “Ubuntu Linux.”
After setting the menu to Ubuntu Linux, locate “Ubuntu Linux 20.10 (x86, 64-bit), DEB Package” and click on the download button next to it to grab the latest release of the package.
Ubuntu 20.04
If you’d like to get MySQL Workbench on Ubuntu 20.04, start by heading over to the workbench website. On the website, find the “Select Operating System” drop-down menu and set it to “Ubuntu Linux.”
With the menu set to “Ubuntu Linux,” download links will appear. Look for “Ubuntu Linux 20.04 (x86, 64-bit), DEB Package,” and select the download button next to it to grab the package.
Ubuntu 18.04
If you’re still on Ubuntu 18.04 and need to get the MySQL Workbench app installed, here’s what to do. First, head over to the website and find the “Select Operating System” drop-down menu. Set it to “Ubuntu Linux.”
Once the menu is set, download links will appear on the page. Locate the “Ubuntu Linux 18.04 (x86, 64-bit), DEB Package” option, and click on the download link next to it to grab the latest package.
Verifying your download
It is a good idea to verify the package you’ve downloaded from the MySQL website. Verifying the integrity of these files ensures you are installing software that is safe and not tampered with.
To verify the MySQL Workbench DEB packages’ integrity, head over to the official MySQL Workbench documentation. The docs outline precisely how you can verify the signatures on your package to determine if it is safe to use.
Installing MySQL Workbench on Ubuntu – terminal
To install the MySQL Workbench application on Ubuntu via the terminal, do the following. First, launch a terminal window. To launch a terminal window on the Ubuntu desktop, press Ctrl + Alt + T on the keyboard. Or, search for “Terminal” in the app menu.
Once you’ve opened the terminal window, use the CD command to move into the “Downloads” folder. This folder has the MySQL DEB package.
cd ~/Downloads
From here, you can install the MySQL DEB package. To do that, use the following apt install command below.

sudo apt install ./mysql-workbench-community_*_amd64.deb
Upon entering the command above, Ubuntu will detect the package in your “Downloads” folder and automatically detect any dependencies and libraries that must be installed alongside it.
When Ubuntu is done collecting everything, you’ll see a prompt that asks you if you’d like to install the software. From here, press the Y button to confirm. After confirming, Ubuntu will install MySQL Workbench onto your system.
After the installation is complete, close the terminal window.
Installing MySQL Workbench on Ubuntu – GUI
To install the MySQL Workbench DEB package in GUI mode, do the following. First, open up the Ubuntu file manager. Once it is open, find the “Downloads” folder and select it to access your downloads.
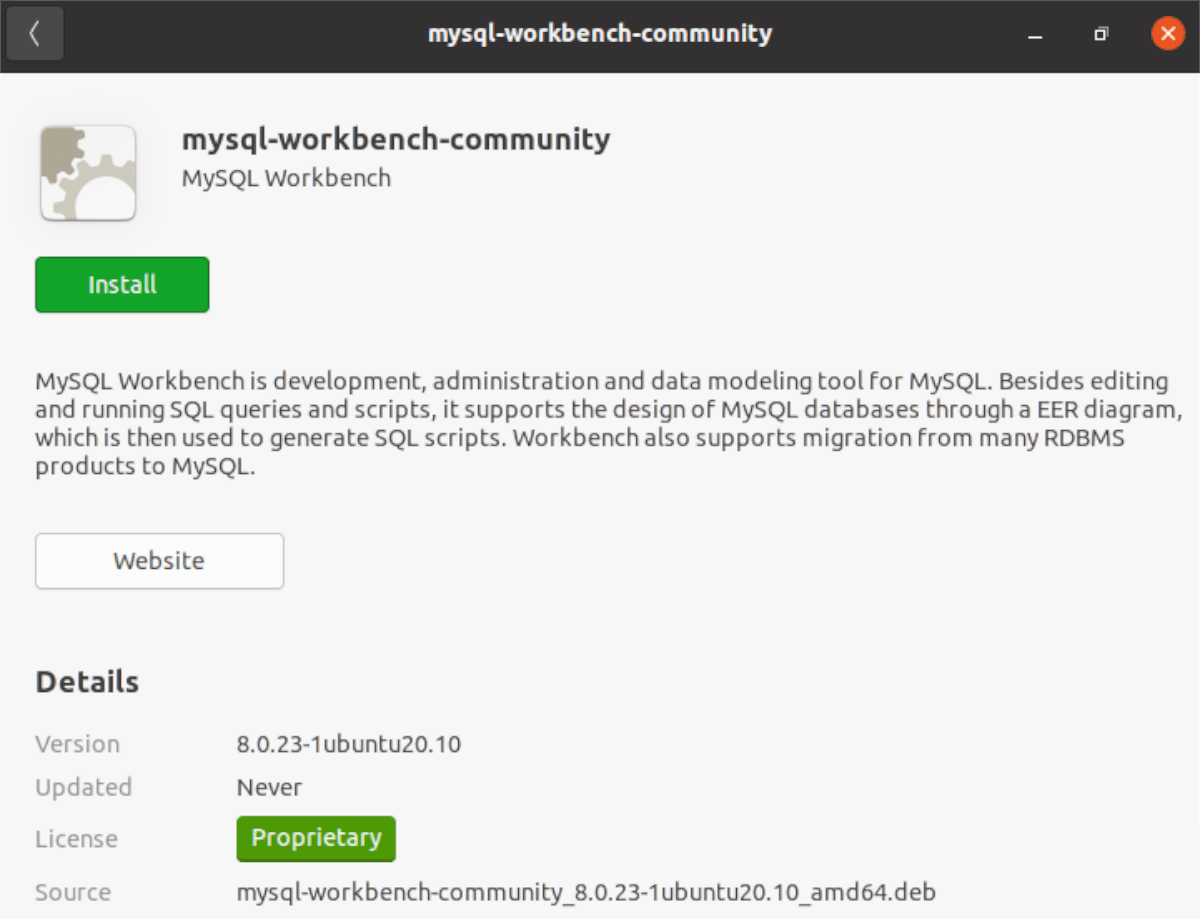
Inside the “Downloads” folder, locate the MySQL DEB package and right-click on it with the mouse. In the right-click menu, select “Open With Software Install” and click on it. By choosing this option, the Ubuntu Software app will launch.
Inside Ubuntu Software, locate the “Install” button and click on it with the mouse. You’ll then be prompted to enter your password. Do so.
Upon entering your password, the software will install on Ubuntu. The installation will not take long. When the process is complete, you’re free to use the software as you see fit.

Now that MySQL Workbench is installed on Ubuntu, the setup process is complete. Feel free to close the Ubuntu Software window as it is no longer needed.