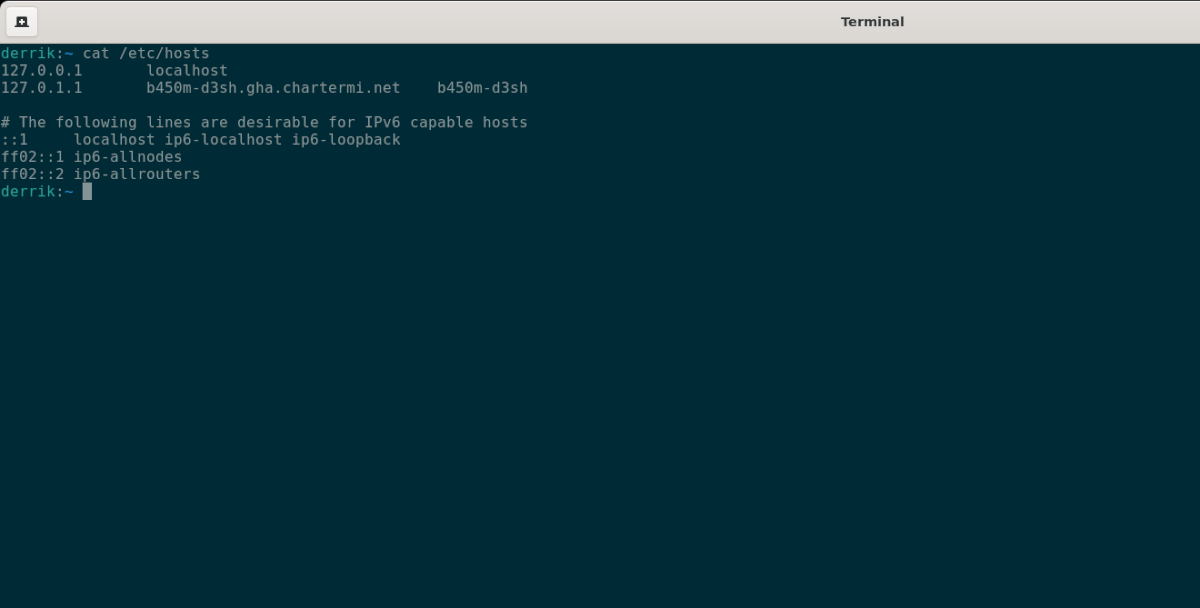
The Hosts file on Linux is responsible for mapping hostnames and IP addresses. It’s a plain text file named “Hosts.” If you’ve ever run servers on Linux, you’ll no doubt find yourself editing this file a lot.
In this guide, we’ll show you how to access the Hosts file on Linux and how to back it up too. To start, ensure you have access to the root account. The Hosts file is a system-level file and cannot be accessed by a regular user.
Making a backup of the Hosts file
If you plan to edit the Hosts file, it is good to create a backup of the original beforehand. That way, if you make changes to the file and want to revert to how things were before the edits, you don’t have to re-install your system.
To make a backup of the Hosts file, start by entering the/etc/ folder using the CD command below in the terminal window.
cd /etc/
Inside of the /etc/ folder, make a copy of the Hosts file using the cp command. Copy the file to your home folder (~) as “Hosts.bak”.
cp hosts ~/hosts.bak
Once you’ve made a backup of the file, close the terminal. Keep the “Hosts.bak” file safe on a spare hard drive, flash drive, or Dropbox account.
How to restore your backup
If you’ve made edits to the Hosts files and need to restore them, here’s how to do it. First, open up a terminal window. Then, with the terminal open, access the area where your “hosts.bak” file is saved.
For example, if you’ve stored your “hosts.bak” file in /home/USERNAME/Documents, you’d do the following to access it.
cd ~/Documents/
Once the terminal is where the “hosts.bak” file is, log into the root account using sudo -s.
sudo -s
Delete the existing file using the rm command.
rm hosts
After deleting the original host file, restore the backup to your computer using the cp command. Using cp will allow you to create a copy of the backup file and place it in /etc/while keeping the backup where it is stored.
cp hosts.bak /etc/
When the copying process is complete, the original host file will be restored. From here, reboot your Linux PC. When your Linux PC turns back on, you’ll be using your original hosts in the Hosts file.
Accessing the Linux Hosts file
If you want to edit the Linux Hosts file, you’ll need to access it first. The file is located in the /etc/ folder, but a normal Linux user account can’t access this file, as it is a system file.
You can either log in with the su command or use the sudo -s command to access the root account. Generally, most Linux systems will be able to access root using the su command. However, on Ubuntu and some other distributions, the root account is turned off, so you need to use sudo -s.
First, open up a terminal window on the Linux desktop. Then, open up a terminal window on the Linux desktop and press Ctrl + Alt + T on the keyboard. Or, search for “Terminal” in the app menu and launch it that way.
Once the terminal is open, enter either of the two commands below to access the root account on your Linux PC.
su -
Or, if the root account on your Linux system is disabled, you can access root by elevating the session using sudo -s.
sudo -s
When you’ve logged into root, use the CD command to access the /etc/ folder.
cd /etc/
Inside of the folder, open up the “Hosts” file using the Nano text editor. In this tutorial, we will be using Nano. However, the “Hosts” file can be opened with any text editor you wish.
nano -w hosts
Editing the Hosts file
To edit the Hosts file, you’ll need to understand how it works. Each entry has an IP address and a hostname. Look through the file in the Nano text editor and take a look at the lines inside.
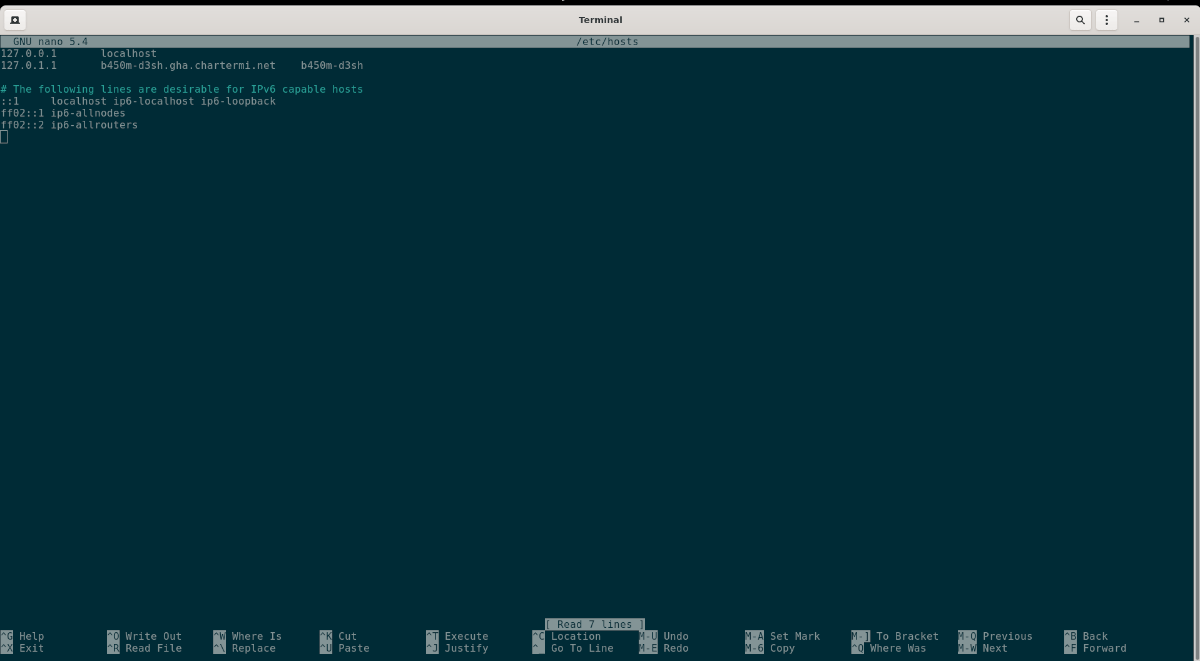
For example, a line in the Hosts file might look like the code below.
192.168.1.205 my.hostname
If you want to add new lines to the Hosts file, make a new line at the bottom and type out the IP address and the hostname. Then, save the edits in the Nano text editor by pressing Ctrl + O on the keyboard.
Feel free to add as many new lines as you wish to the host file. When you’ve finished the editing process, press the Crl + X button combination to exit the Nano text editor.