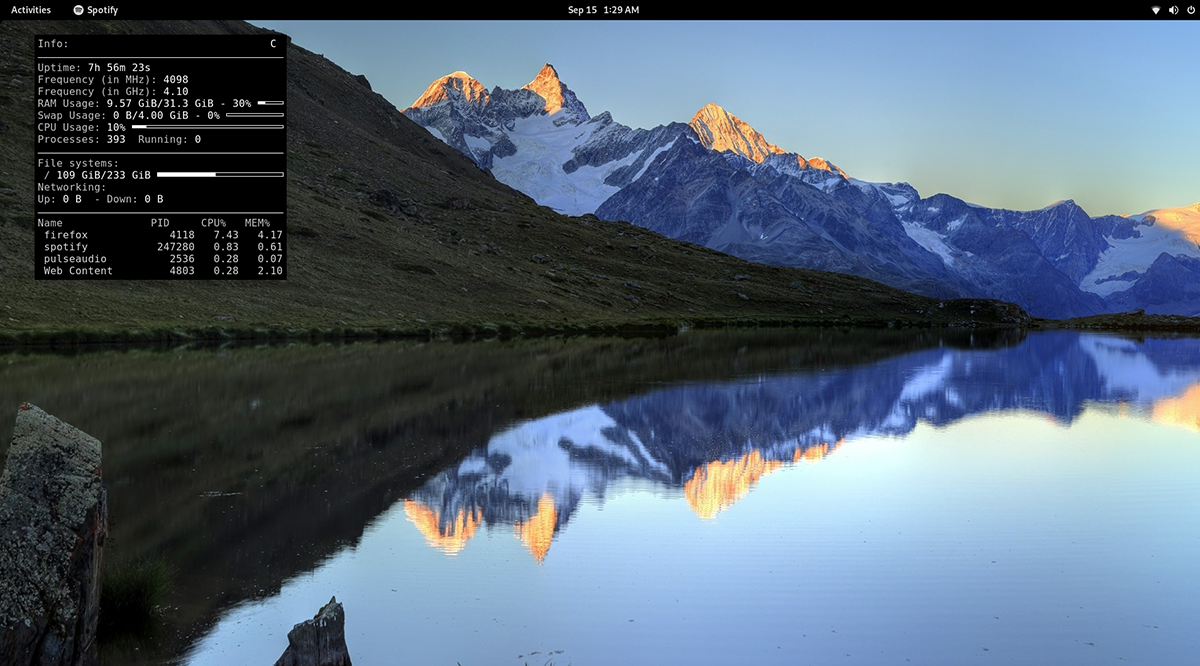
Conky is a system monitor tool for the Linux desktop. With it, users can view everything from their RAM usage, CPU usage, disk usage, and more right on the desktop. Here’s how to get it working on your system.
Note: Conky doesn’t work on Linux desktop environments that use Wayland.
Installing Conky on Linux
Conky is an incredible tool that users can install to display system information right on the desktop. Conky has been around a long time, and as a result, is supported on a wide variety of Linux operating systems.
Before we can go over how to use Conky to display information on your Linux desktop, you’ll need to install the program. To install Conky on Linux, start by opening up a terminal window on the Linux desktop.
To open up a terminal window on the Linux desktop, press Ctrl + Alt + T on the keyboard. Alternatively, you can open a terminal window by searching for “Terminal” in the app menu.
Ubuntu
To get the Conky application set up in Ubuntu, use the apt install command and install the “conky” package.
sudo apt install conky
After writing in the above command, you’ll be asked to enter a password. Using your keyboard, write in your password into the terminal prompt and press Enter. Then, press the Y key on the keyboard to confirm you wish to install Conky on Ubuntu.
Debian
If you’re using Debian, you’ll be able to get the Conky application installed on your system using the apt-get install command below. Keep in mind, as Debian is slow to update, this version of Conky might be out of date.
sudo apt-get install conky
Once you write in the command above in the terminal, Debian will ask for your password. Using your keyboard, write in the password. Then, press the Enter key to continue.
After pressing the Enter key, Debian will ask you to confirm you wish to install Conky after pressing Y on the keyboard after pressing the Enter key. Do so to install the application on your Debian system.
Arch Linux
The Conky application can be installed on your Arch Linux system with the pacman command. Using the command below, install the app on your system.
sudo pacman -S conky
Upon writing the command above into a terminal, Arch Linux will ask for a password. Using your keyboard, write in the password. Then, press the Y key to continue installing Conky.
Fedora
If you want to install Conky on Fedora Linux, you’ll have to do it with the dnf command below.
sudo dnf install conky
After writing the command above into the terminal window, Fedora will ask for a password. Using your keyboard, write your password into the prompt. Then, press the Y key to install Conky on your system.
OpenSUSE
Need to get Conky working on OpenSUSE Linux? You’ll be able to install it on your computer using the zipper install command below.
sudo zypper install conky
After writing in the command above, OpenSUSE will ask for your password. Using the keyboard, write in your password. Then, press the Y key to continue installing Conky.
Running Conky
The command line runs Conky, but it is not a terminal tool. Instead, it displays itself on the desktop of any Linux desktop UI. To get it to work, do the following.
First, press the Alt + F2 keys on the keyboard at the same time. Doing this will open up your desktop’s command launch bar. In this bar, type in “conky.” Then, press the Enter key on the keyboard.

When you press the Enter key on the keyboard, you’ll execute the command. With this command is launched, Conky will display on your desktop. If you wish to close Conky, do the following.
Press Alt + F2 on the keyboard to open up the command launch bar again. Then, use the command “killall conky” to close the Conky window on your desktop. You can also run this command in a terminal window.
Running Conky at startup
To run the Conky application at startup, you have to create a desktop entry in the autostart folder. To do this, open up a terminal window and use the touch command to create a new file.
touch ~/.config/autostart/conky.desktop
After creating the new file, open up the Nano text editor using the command below.
nano -w ~/.config/autostart/conky.desktop
Inside of the Nano text editor, paste the following code into the text box.
[Desktop Entry]Name=Conky
GenericName=background monitor
Exec=conky &
Terminal=false
Type=Application
Icon=conky
Categories=System;
StartupNotify=false
Name[en_US]=conky
After pasting the code, press Ctrl + O on the keyboard to save your edits. After that, close the Nano text editor by pressing Ctrl + X on the keyboard. From now on, when you boot up, you’ll see Conky on the desktop!