If you’ve used Ubuntu long enough, you’ll notice that the Linux kernel doesn’t often get updated to a new release. Usually, the Ubuntu developers push out point releases until the next new Ubuntu release.

This guide will go over how you can update the Ubuntu kernel manually by downloading developer kernel packages. We’ll also cover a useful app known as Mainline to give you new kernel upgrades on Ubuntu.
Ubuntu: update kernel – Downloading kernel packages manually
A foolproof way of getting the latest Linux kernel on Ubuntu is by manually downloading all of the packages directly from the Ubuntu mainline kernel website. The Ubuntu mainline kernel website regularly publishes new releases of the Linux kernel, built for Ubuntu.
These packages aren’t bug-proof, and often you’ll find Linux kernel modules refusing to install at times. However, if you want to update the Linux kernel on Ubuntu, this is a great way to go.
To update your Ubuntu kernel using the mainline packages, follow the step-by-step instructions below.
Step 1: Open up a terminal window on the Ubuntu desktop. A terminal window is required to deal with kernel packages. You will not be able to update your Ubuntu kernel with the Ubuntu software center.
To open up a terminal window on the Ubuntu desktop, press Ctrl + Alt + T on the keyboard. Alternatively, search for “Terminal” in the app menu and launch it that way.
Step 2: Once the terminal window is open on your Ubuntu PC, install the Lynx command-line web browser. This web browser will come in handy later on in the instructions.
To install the Lynx web browser on your Ubuntu Linux PC, make use of the following apt install command and install the “lynx” package.
sudo apt install lynx
Step 3: After installing the Lynx package, head over to the Ubuntu mainline kernel website. Once on the website, find a kernel version to install. The link we’ve provided sorts the versions from newest to oldest.
For example, to access the Linux kernel 5.11, you’d select the v5.11 folder, etc.
Step 4: After you’ve accessed the kernel version folder, scroll down the page till you find the “amd64” folder. If you can’t find it, it is in the file list below the package links.
Step 5: When you’ve opened up the “amd64” folder on the mainline kernel website, the URL box in your web browser should look similar to the example below.
https://kernel.ubuntu.com/~kernel-ppa/mainline/v5.11/amd64/
Take the URL and put it in the command below, replacing MY_KERNEL_URL_HERE.
lynx --dump MY_KERNEL_URL_HERE | awk '/http/{print $2}' | grep deb | grep -v "lowlatency" > ~/kernel-packages.txt
Step 6: After replacing the MY_KERNEL_URL_HERE in the command, it should look like the example below. In this example, we are using kernel 5.11.
lynx --dump https://kernel.ubuntu.com/~kernel-ppa/mainline/v5.11/amd64/ | awk '/http/{print $2}' | grep deb | grep -v "lowlatency" > ~/kernel-packages.txt
Write out the above command into the terminal and press the Enter key to execute it. Once the Enter key is pressed, the Lynx web browser will generate a list of links for all Ubuntu kernel packages stored in kernel-packages.txt in your home (~) directory.
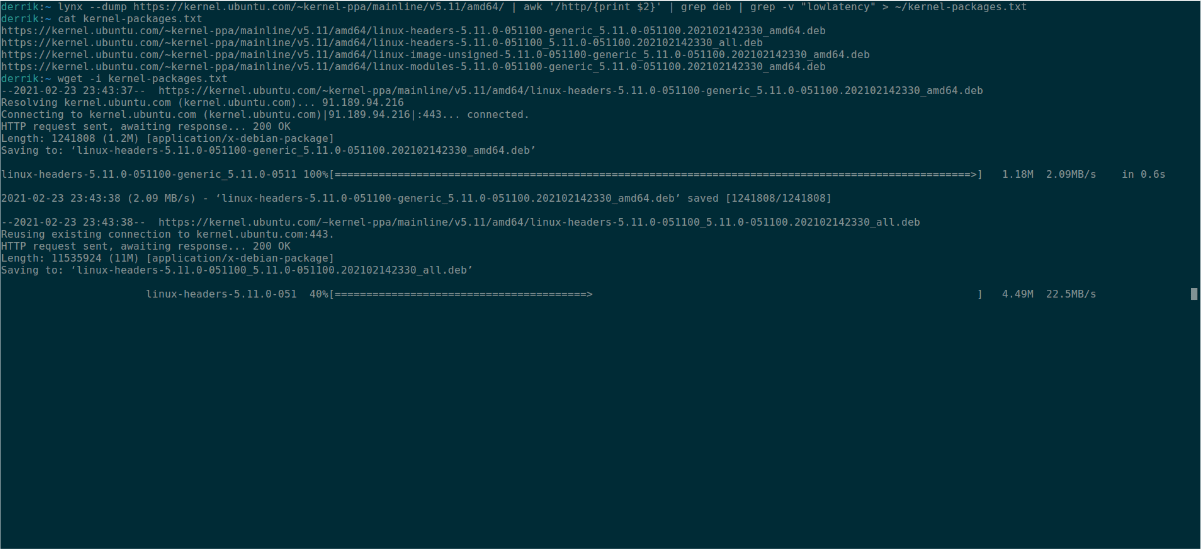
Step 7: Lynx has generated a list of links for the Ubuntu kernel version you wish to install. It’s now time to download the packages. Using the wget command, grab all of the kernel packages listed in the kernel-packages.txt file.
wget -i ~/kernel-packages.txt
Step 8: Once all packages are done downloading to your Ubuntu PC, you can install them, thus updating the Ubuntu kernel to a newer version than what is provided in the Ubuntu repos.
sudo dpkg -i linux-*.deb
Step 9: Reboot your Ubuntu PC. When your Ubuntu PC finishes rebooting, you’ll have access to the new kernel you’ve installed! Enjoy your updated Ubuntu kernel!
Ubuntu: update kernel – Mainline
If downloading the Linux kernel packages via the Ubuntu developer website isn’t your thing, you’ll want to check out Mainline. It can update Ubuntu’s kernel to a new version with a slick user interface.
To get started, you’ll need to install the Mainline application. To install it, open up a terminal window and use the add-apt-repository command below to get the program working.
sudo add-apt-repository ppa:cappelikan/ppa
After adding the PPA, you will need to execute the update command. This command will refresh Ubuntu’s software sources and make the new PPA accessible.
sudo apt update
Following the update, install the Mainline app using the apt install command below.
sudo apt install mainline
Once Mainline is installed, search for “Mainline” in your app menu, and open it. When the app is open, look through the Ubuntu kernels list and select the one you wish to install with the mouse. Then, select the “Install” button to continue.
After clicking on the “Install” button, Mainline will download and install the new Ubuntu kernel version. When the process is complete, close the program and reboot your PC.
Upon logging back in, you’ll be using a newly updated Ubuntu kernel!