Are you tired of writing in long commands in your Ubuntu terminal? Want to find a better way? If so, you may want to set up terminal aliases in the Ubuntu terminal. In this guide, we’ll show you how.
What is an alias?
An alias is a command-line shortcut. Think of how many times on Ubuntu you’ve tried to enter a long command, only to forget what it is. An alias can be set up as a shortcut to that long command, so you don’t have to remember it.
If you find yourself using the terminal on Ubuntu a lot for development, programming, or just because you like the command-line, learning how to set up aliases is a great idea.
Aliases are configured in the ~/.bashrc file in your Ubuntu home folder. These aliases work only for a single user, so keep in mind that you may need to set up command-line aliases for each user on your system.
Backing up your Bashrc file
The default Bashrc file in Ubuntu has some nice configuration changes in it to make your life easier. These additions aren’t required, but it would be a shame to lose what the developers have already set up.
To save the configuration in your Bashrc file, we’ll need to make a backup. To make a backup, start by opening up a terminal window on the Ubuntu desktop. You can do this by pressing Ctrl + Alt + T on the keyboard or by searching for “Terminal” in the app menu.
Once in the terminal, use the cp command to make a copy of ~/.bashrc. This copy will be named .bashrc.bak, and will be unedited. That way, if you want to undo all of the changes done in this guide, you can do so.
cp ~/.bashrc ~/.bashrc.bak
At any time, if you wish to restore the backup, run the commands below.
rm ~/.bashrc
mv ~/.bashrc.bak ~/.bashrc
Adding an alias
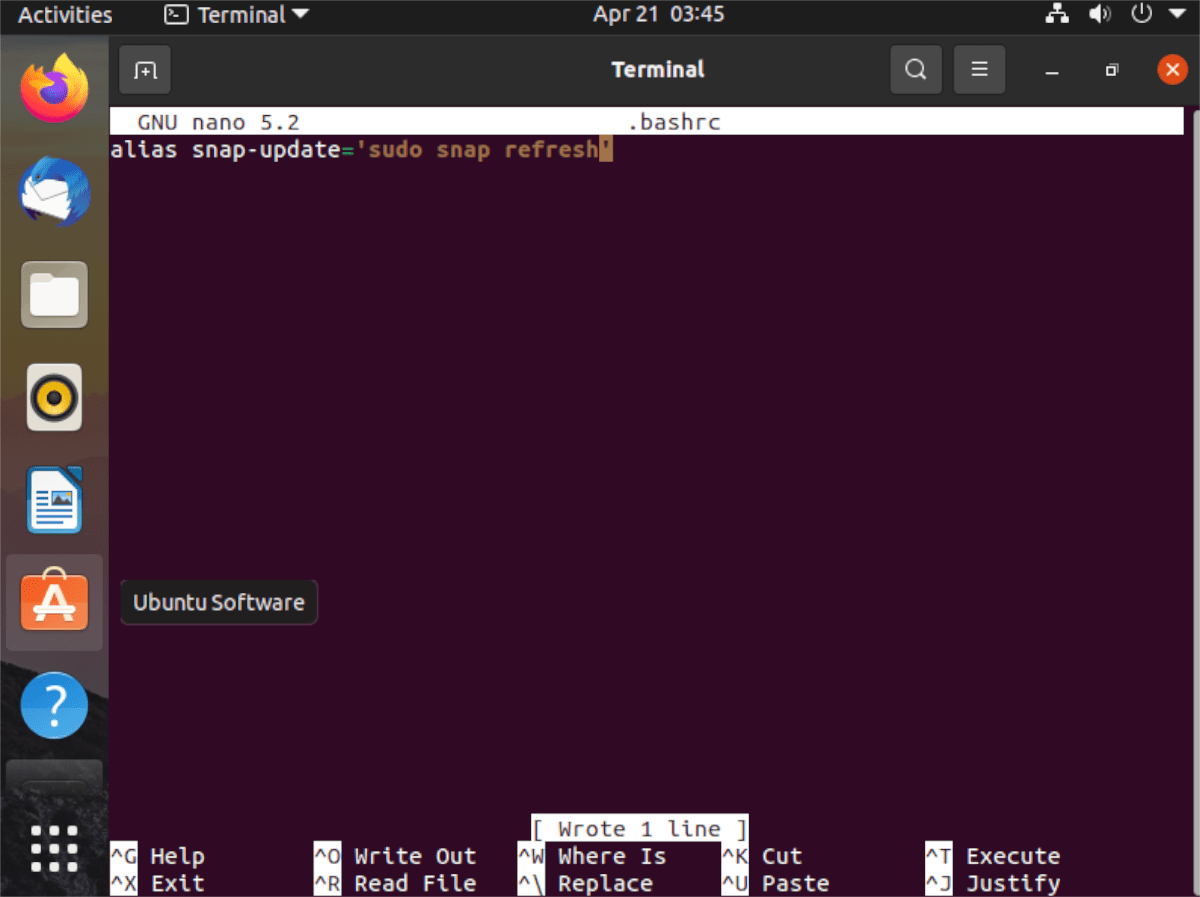
Adding an alias to the Ubuntu terminal is very straightforward and easier than it sounds. To start, you must open up your Ubuntu user’s Bashrc file for editing purposes. In this guide, we’ll use the Nano text editor.
nano -w ~/.bashrc
Once the file is open in the Nano text editor, scroll to the bottom and press the Enter key to create a new line. After creating a new line, write out the word alias. Every command-line alias must start with this word.
alias
With alias added, it is time to name your shortcut command. For example, if you wanted your command shortcut to make it easier to update Snap packages, you might do snap-update, etc.
alias snap-update
Following the shortcut command, you must add an = sign. This sign will tell the Bash shell that this is where the long command begins.
alias snap-update=
After the = sign, add in the first ‘ mark. This mark tells the Bash shell where the long command begins.
alias snap-update='
Following the first ‘ mark, add in your command. So, if you want to make updating Ubuntu’s Snaps easier, you’d add in sudo snap refresh. Keep in mind; you can add in as many commands as you like, so long as there is a ; between them.
alias snap-update='sudo snap refresh'
Once you’ve finished adding your alias to the Ubuntu terminal, save the edits with Ctrl + O and exit with Ctrl + X.
Activating an alias
Aliases aren’t active in your terminal window the minute you save your Bashrc file. This is because the terminal session has to be refreshed. If you edit your Bashrc file and add a new alias, it likely won’t work right away.
Thankfully, there’s a command you can enter to activate your new aliases in the Ubuntu terminal instantly. Here’s how it works.
First, add in your new command-line aliases using the steps in the “Adding an alias.” Once you’ve taken care of that, save the edits to your Bashrc text file by pressing Ctrl + O and exit with Ctrl + X.
Once out of Nano, use the source command on the ~/.bashrc file. You’re telling the Bash terminal in Ubuntu to use the newly updated configuration by entering this command.

source ~/.bashrc
After the command above is run, your new alias should be active and ready to use right away.
Turning aliases off
It is possible to shut off aliases in Ubuntu if you wish to. Here’s how to do it. First, open up the Bashrc file for editing purposes using the nano command below.
nano -w ~/.bashrc
Once the Bashrc file is open and ready to be edited, locate the alias you wish to disable in Ubuntu. When you’ve found it, add a # symbol in front. For example, to shut off our Snap update alias, it should look like the command below.

#alias snap-update='sudo snap refresh'
When your alias is shut off, press the Ctrl + O button to save and exit with Ctrl + X. Then, run the source command to update the Bashrc file.
source ~/.bashrc
After running the source command, your alias will be disabled.