Need to test your hard drive speed on Linux but can’t quite figure it out? We can help! Follow along with this guide as we go over how you can test your disk speed on Linux!
Gnome Disk Utility
If you want to test disk speed on Linux, the best way to go about it is with the Gnome Disk Utility. It’s a handy, easy-to-understand program that can benchmark and test hard drive speeds.
The Gnome Disk Utility application doesn’t come pre-installed on every Linux operating system, though, so before we go over how to use it to test your hard drive disk speed, you will need to install the program.
To start the installation of Gnome Disk Utility on your Linux PC, open up a terminal window. You can open up a terminal window by pressing Ctrl + Alt + T on the keyboard. Or, open up the app menu and search for “Terminal.”
Once the terminal window is open and ready to use, follow along with the installation instructions down below to get the Gnome Disk Utility application set up on your Linux PC.
Ubuntu
On Ubuntu, install the Gnome Disk Utility application by making use of the apt install command below.
sudo apt install gnome-disk-utility
Debian
Those using Debian Linux will be able to get the Gnome Disk Utility application set up by executing the apt-get install command.
sudo apt-get install gnome-disk-utility
Arch Linux
On Arch Linux, the Gnome Disk Utility application is installable via the Pacman command below.
sudo pacman -S gnome-disk-utility
Fedora
Those on Fedora Linux can get the Gnome Disk Utility program working via the dnf install command.
sudo dnf install gnome-disk-utility
OpenSUSE
On OpenSUSE Linux, the Gnome Disk Utility program is easily installed by making use of the zypper install command below.
sudo zypper install gnome-disk-utility
Now that the Gnome Disk Utility application is open launch the program by searching for “Disks” in your app menu. Then, follow the step-by-step instructions down below to test your disk speed on Linux.
Step 1: Inside the Gnome Disk Utility app, look to the left-hand sidebar and locate the disk whose speed you want to test. Then, click on it with the mouse to look at the overview of the app’s drive.
Step 2: Find the menu button in Gnome Disk Utility, and select it with the mouse to open it up. If you cannot find the menu, look to the left of the minimize button.
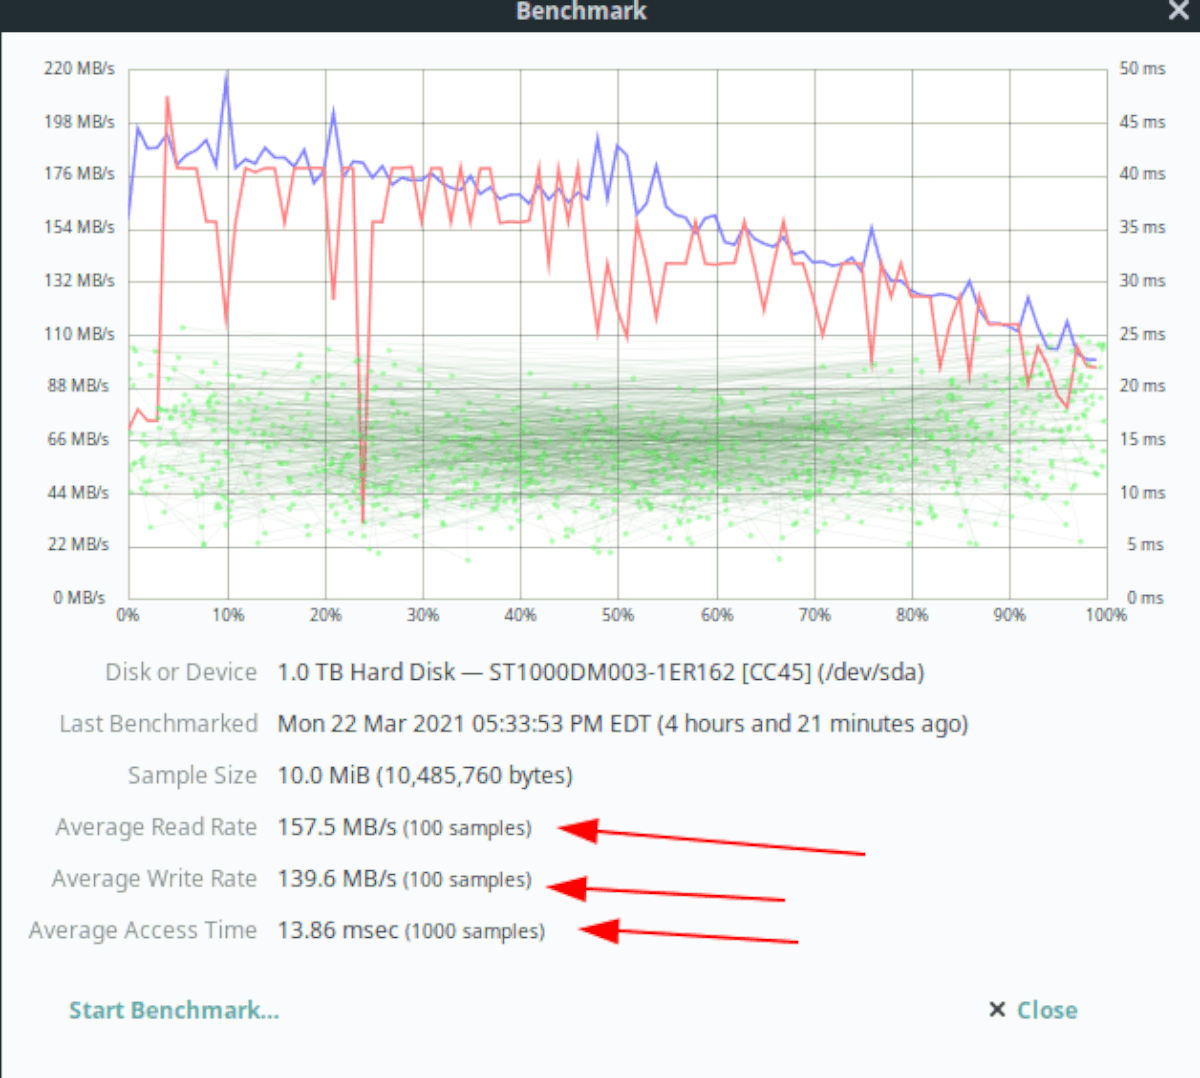
Inside the Gnome Disk Utility menu, locate the “Benchmark Disk” button and select it with the mouse. By choosing the “Benchmark Disk” button, you’ll open up the tester tool.
Step 3: Once the benchmark tool is open, locate the “Start Benchmark” button, and click on it to start up the benchmark. Keep in mind that this benchmark could take a bit of time to complete, so be patient.
When the benchmark tool is complete, Gnome Disk Utility will create a full readout of your hard drive. To check the speed, find the “Average Read Rate” and “Average Write Rate.” This will tell you your hard drive speed.
HDParm
HDParm is another application that you can use to test your disk speed on Linux. It’s not as easy to use as Gnome Disk Utility, and there isn’t a GUI, but it is just as helpful.
The HDParm application isn’t installed by default on every Linux operating system out there, but it is on quite a few. To check if HDParm is installed on your computer, run the hdparm –help command in a terminal window.
If you do not have HDParm installed on your Linux PC, open up a terminal window on the Linux desktop by pressing Ctrl + Alt + T on the keyboard. Once the terminal window is open, follow the installation instructions below.
Ubuntu
You can install HDParm on Ubuntu with the apt command.
sudo apt install hdparm
Debian
To install HDParm on Debian, use apt-get.
sudo apt-get install hdparm
Arch Linux
On Arch Linux, install HDParm by using Pacman command.
sudo pacman -S hdparm
Fedora
On Fedora, install HDParm with dnf.
sudo dnf install hdparm
OpenSUSE
Install HDParm on OpenSUSE with zypper.
sudo zypper install hdparm
Once HDParm is installed on your computer, follow the step-by-step instructions below to test your disk speed.
Step 1: First, run the lsblk command to view all connected hard drives on the system.
lsblk
Look through and find the hard drive you plan to test. In this example, we’ll test /dev/sda. For more information on finding hard drive info in lsblk, read this guide on the subject.
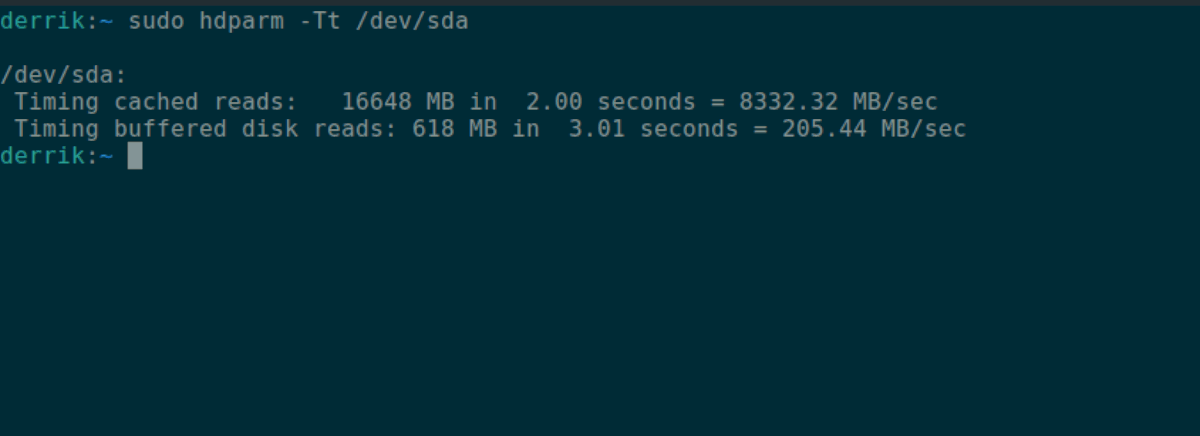
Step 2: Execute the hdparm -Tt command on the hard drive to begin the test.
sudo hdparm -Tt /dev/sda
When the test is complete, you’ll see the test results on the screen.