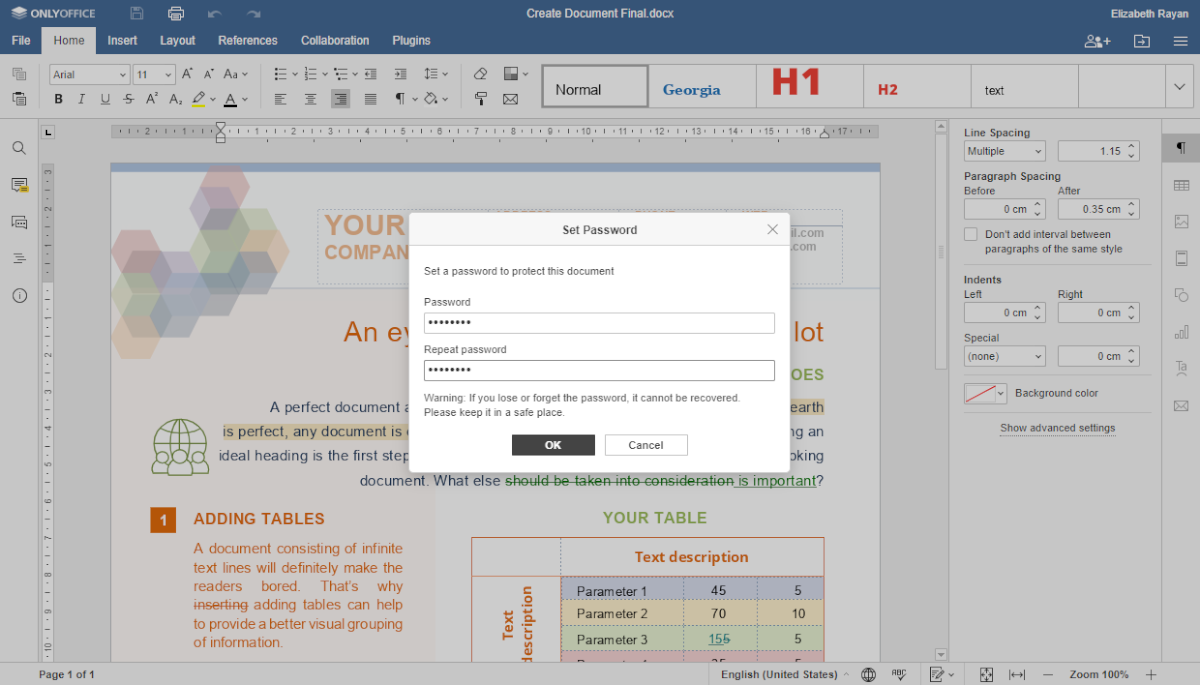
OnlyOffice 6.3 is out, and with it comes new exciting features. These features include new light/dark themes, password-protected documents, support for fractional scaling, and much more. Here’s how to get it working on your Linux system.
Ubuntu/Debian installation instructions
There are many ways to install OnlyOffice 6.3 on your Ubuntu system. That being said, the best way to go for Ubuntu users is to download the latest DEB package from the official website.
Note: if you use Debian, you will also be able to install OnlyOffice 6.3 with the instructions below.
To start downloading OnlyOffice 6.3 on your Ubuntu system, head over to the download page here. Once there, locate the “Debian 8, Ubuntu 14.04 and higher ” option. Then, click on the “DOWNLOAD DEB” button with the mouse.
After selecting the download button, OnlyOffice 6.3 for Ubuntu will begin downloading to your computer. When the download is complete, open up a terminal window on the desktop by pressing Ctrl + Alt + T on the keyboard or search for “Terminal” in the app menu.
With the terminal window open and ready to use, enter the CD command to move into the “Downloads” folder on your computer.
cd ~/Downloads
Once inside the “Downloads” folder, you’ll be able to start the installation of Only Office 6.3 using the apt install command below.
sudo apt install ./onlyoffice-desktopeditors_amd64.deb
Alternatively, if you’re on an older release of Debian, you may need to set up the package using the following dpkg command instead.
sudo dpkg -i onlyoffice-desktopeditors_amd64.deb
Following the installation of the package, you’ll have to correct any dependency issues that may have arisen during the installation process.
sudo apt-get install -f
Arch Linux installation instructions

On Arch Linux, it is possible to get OnlyOffice 6.3 working. However, the official website doesn’t support it. Instead, if you plan to use the software, you’ll need to use the community AUR package.
Use the pacman command to download and install both the “git” and “base-devel” packages to get started. These packages are required to use the Trizen AUR helper tool, which will make it much easier to set up OnlyOffice.
sudo pacman -S git base-devel
After installing the two packages on your system, it is time to build and set up the Trizen AUR helper. To get started, download the latest release of Trizen.
git clone https://aur.archlinux.org/trizen.git
Once Trizen is downloaded, use the makepkg command to install the tool onto your Arch Linux system.
cd trizen/
makepkg -sri
Use the trizen -S command to install OnlyOffice 6.3 on your Arch Linux system with everything installed.
trizen -S onlyoffice-bin
Fedora installation instructions
There are multiple ways to install OnlyOffice on Fedora. However, the best way to go about it is to download the RPM package and install it. Head over to the download page here to get your hands on the latest RPM package for OnlyOffice.
Once on the download page, scroll down and locate the “For CentOS and RHEL” area. Then, select the “Download RPM” button to start the download. When the download is complete, open up a terminal window on the Fedora desktop.
Inside of the terminal window, use the CD command to move into the “Downloads” folder. Then, use the dnf install command to set up OnlyOffice 6.3 on your Fedora Linux system.
cd ~/Downloads
sudo dnf install onlyoffice-desktopeditors.x86_64.rpm
OpenSUSE installation instructions
OpenSUSE Linux is RPM-based like Fedora. However, Fedora and RHEL/CentOS are very similar and OpenSUSE, while it uses RPM packages, is different. The best way to get OnlyOffice 6.3 on your OpenSUSE system is to follow either the Snap or Flatpak installation instructions below.
Or, try your hand at downloading the RPM package on the download page and installing it. However, we will not cover that installation method here.
Snap installation instructions
OnlyOffice 6.3 is readily available to all Linux users via the Ubuntu Snap package store. If you’re running a Linux OS that can use Snaps, here’s how you get it working.
Note: you must have the Snapd runtime configured and running on your Linux PC for the command below to work successfully.
To get the latest release of Only Office up and running as a Snap package on your Linux PC, you’ll need a terminal window open. You can open up a terminal window on the Linux desktop by pressing Ctrl + Alt + T on the keyboard.
Once the terminal window is open, use the snap install command below to get OnlyOffice 6.3 up and running.
sudo snap install onlyoffice-desktopeditors
Flatpak installation instructions
OnlyOffice 6.3 is available to Linux users as a Flatpak in the Flathub app store. If you’d like to install it on your system, you’ll first need to follow our guide on setting up the Flatpak runtime.
When the Flatpak runtime is configured on your system, you’ll be able to set up the latest release of OnlyOffice via Flatpak with the two commands below.
flatpak remote-add --if-not-exists flathub https://flathub.org/repo/flathub.flatpakrepo
flatpak install flathub org.onlyoffice.desktopeditors