There are plenty of reasons why you’d want to remove all data from your iPhone permanently, without any way of recovering it whatsoever. For instance, you may want to sell the device and you’re worried about private data falling in the wrong hands, and it’s not like that never happened before.
Fortunately, all modern devices have this feature built-in, although its effectiveness may vary from one device to another. However, when it comes to iPhones, you can rest assured that once your data has been wiped, there’s no way to recover it once the process comes to an end.
How to Wipe an iPhone Clean
iPhones have been known for their intuitive user interface for a long time, and they’re still rocking the same style years after the release of the first model. Therefore, wiping your device should be just as easy as sending a message to your mom or checking your emails, right?
Well, sort of. If you’re 100% sure you want to get rid of all your data, you just head to the appropriate section, hit that button, and enjoy your data going down a black hole. However, if you’re switching to a different device, you might want to perform a few extra steps first, to make sure that you won’t lose precious information forever.
With that in mind, let’s see how you can wipe your iPhone safely and without significant effort, while also making sure you’re not messing up the process and saving anything that’s worth saving beforehand.
How to erase iPhone before selling?
1. Run preparatory steps
First and foremost, you must decide whether you’re going to keep the device you’re wiping or you’re upgrading to a different one. If you’re keeping it, then there’s no need to run these operations, as you’ll still be in charge of the device.
2. Disable iMessage
You only want to disable iMessage and FaceTime on your iPhone if you plan on switching to a non-Apple phone (Android, for instance). The reason why you should definitely disable iMessage before you move to a different device is that you might not be able to receive SMS or MMS messages on your new phone if you don’t.
That being said, make sure you didn’t remove your SIM card from your iPhone, then perform the following steps:
Using your iPhone:
- Unlock your iPhone
- Open the Settings app
- Go to the Messages section
- Tap the green iMessage switch
- Go back to the Settings app
- Head to the FaceTime section
- Turn FaceTime off
That’s it, you just disabled iMessage and FaceTime on your iPhone and shouldn’t experience any issues after moving your SIM card to your new device. However, just so you know, it’s possible to deactivate iMessage if you don’t have access to your iPhone any longer. Here’s what you need to do:
Without using your iPhone:
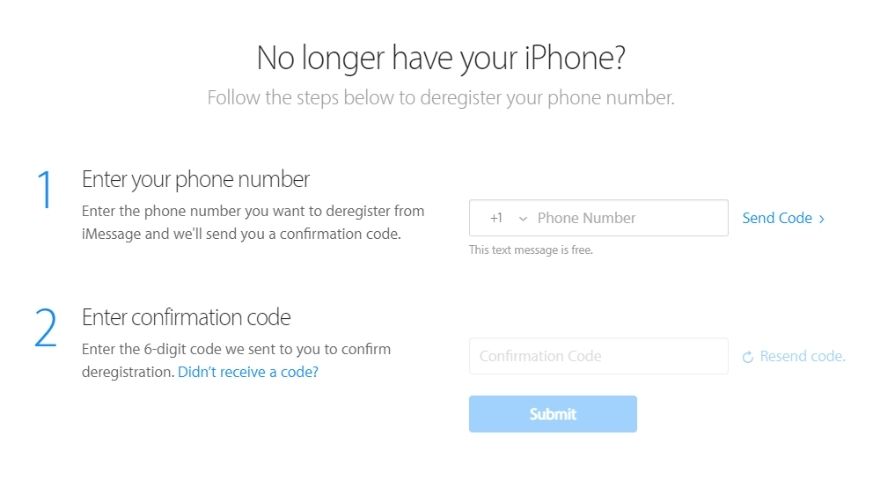
- Launch your web browser of choice
- Go to Apple’s Deregister iMessage web page
- Type your phone number in the first field
- Click the Send Code button
- Wait for the message to arrive on your phone
- Type the confirmation code in the second field
Note that you’ll have to type a phone number associated with iMessage, and you’ll have to own that phone number in order to disable the service centrally. Once you type in the code, your phone number will no longer be linked to iMessage, and SMS/MMS messages will work as usual.
3. Unpair your Apple Watch
Again, this applies to those of you who plan on getting rid of their iPhone, so if you’re just wiping data on it for any other reason, you might as well skip this step. If you’re selling your iPhone, a good idea is to unpair your Apple Watch.
- Bring your iPhone and Apple Watch close together
- Unlock your iPhone
- Launch the Apple Watch app
- Head to the My Watch tab
- Select your device (somewhere at the top of the screen)
- Tap the “i” button next to your Apple Watch
- Select the Unpair Apple Watch option
- Type your Apple ID password
- Tap the Unpair button again to confirm your action
Note that if you own a GPS + Cellular Apple Watch, you may need to remove your cellular plan. If you’re going to pair your Apple Watch with an iPhone, you should keep the plan, but if you’re about to start using a non-Apple device, you should definitely remove the plan. Additionally, you may want to contact your carrier and ask them to cancel your cellular subscription, if needed.
If you’re also planning to get rid of your Apple Watch, you’ll probably want to wipe your data from it, as well. Here’s how you can safely erase all data from your Apple Watch without significant effort.
Erasing your Apple Watch:
- Open the Settings section
- Head to the General category
- Go to the Reset section
- Select the Erase All Content and Settings option
- If prompted, type your password
- As before, keep or remove your cellular plan
- Tap the Erase All button to confirm your action
Note that erasing your Apple Watch only removes all data, media, and settings from your device, but doesn’t affect the Activation Lock feature, which prevents others from using the watch if you’ve lost it or it’s been stolen.
Therefore, you’ll need to also unpair the Apple Watch to remove the Activation Lock, which we already explained in the section above. Note that Apple automatically performs a backup of your watch’s contents before it erases data on it and saves it on your iPhone.
4. Perform a backup of your data
We shouldn’t have to explain why backing up your data in any given situation is a smart thing to do, especially if you’re performing an operation that can’t be easily (or at all) reversed or engaging in activities you’ve never done before.
So, if it’s your first time wiping an iPhone or feel like you still need some of the data that’s saved on it, just go ahead and back it up somewhere. You’ll most likely end up thanking your lucky stars you did it, so why not save yourself the hassle?
This goes especially if you plan on upgrading to a newer model of iPhone and moving your old data to it might be something you’ll like to do. Fortunately, Apple thought of everything and made it quite easy to backup data on your iPhone, as you can go two ways about it.
You can either backup your data online by using Apple’s iCloud, or you can be more traditional-like and opt for the standard iTunes + cable method. Whichever way you decide to go, at the end you’ll have all data on your iPhone copied someplace safe for you to use later, if needed.
Using iCloud:
- Unlock your iPhone
- Make sure your iPhone is connected to a Wi-Fi network
- Open the Settings app
- Tap your name in the list
- Select iCloud and go to iCloud Backup
- Make sure iCloud Backup is turned on
- Tap the Back Up Now button
- Wait for the backup process to finish and don’t disconnect your iPhone from Wi-Fi
- Check under the Back Up Now button if the process finished successfully
The great part about iCloud backups is that they only require an Internet connection to save your priceless data or restore it to a new device. Anything ranging from Apple Pay details to Face ID information, settings, documents, and accounts is saved during an iCloud backup.
Using the iTunes + cable method:
- Connect your iPhone to your PC (or Mac)
- Launch iTunes (it usually launches automatically)
- Click on your iPhones icon in iTunes
- Go to the Summary section
- Look for the This computer option under the Backups category
- Click the Backup Now button
- Optional: select Encrypt local backup, type a password and click the Set Password button
If everything is done right, iTunes should start backing up data on your iPhone, including your text messages, app data, photos, videos, documents, and music. After the process is done, you can unplug your iPhone and continue with the data wiping process.
5. Remove additional data (optional)
You probably encountered iPhone listings on eBay, Amazon, or Craigslist that mentioned the device isn’t iCloud-locked and wondered what was that all about. To put it shortly, you can (and probably did) lock your device on iCloud, so as to prevent others from messing around with it if you lose it or it gets stolen.
Therefore, if you plan on selling your device or giving it away, the right thing to do would be to break all of its virtual chains. This may sound somewhat complicated, but don’t worry, that’s why we’re here for.
Sign out of iCloud:
- Unlock your iPhone
- Open the Settings app
- Tap the Sign Out button
- Type your Apple ID password
- Tap the Turn Off button
Note that these steps only work for iPhones running on iOS 10.3 or later. Therefore, if you have a device that’s running on iOS 10.2 or earlier, you might want to take a look at the steps below.
- Unlock your iPhone
- Open the Settings app
- Head to the iCloud section
- Tap the Sign out button, then do it again to confirm
- Tap the Delete button under the My [your iPhone name] section
- Type your Apple ID password when prompted
- Go back to the Settings main menu
- Select iTunes & App Store
- Go to Apple ID
- Tap the Sign Out button
Although unlinking your iPhone from older versions of iOS may be a bit more complicated, it’s still quite manageable if you took a bit of time to get familiarized with your device. However, we’re still not done.
Again, these last steps only apply if you’re planning on parting ways with your device. That being said, you should disable the Find My iPhone feature, so that whoever ends up owning your device will be able to use it. Apple installed a failsafe in their iPhones so that if you wipe a device, this feature will remain active so that the original owner of the device can easily locate it.
Disable the Find My iPhone feature:
- Unlock your iPhone
- Open the Settings app
- Select your name from the list
- Go to the iCloud section
- Select Find My iPhone
- Turn the feature off
Now that you’ve unpaired devices, disabled its security services, unlinked your iPhone from iCloud, and backed up your data, we can start the wiping process that will remove all data from your iPhone.
One last thing: just as a precautionary step, you may want to remove the SIM card from your iPhone if you plan on selling it or giving it away to someone else.
6. How to wipe iPhone clean?
The iPhone wiping process is actually called a factory reset, and it means bringing the device back in the state it was when it left the factory where it was assembled (aka brand new).
If you have a jailbroken iPhone and need to wipe data on it without losing the jailbreak, it’s possible to do so, but keep in mind that the process is not exactly simple, as it’s aimed at advanced iPhone users. Fortunately, we’ve explained the process in our comprehensive guide.
The process is quite intuitive and can be performed by following these steps:
- As usual, unlock your iPhone
- Open the Settings app
- Go to the General section
- Scroll down and tap the Reset button
- Tap the Erase All Content and Settings button
- Type your Apple ID password when prompted and confirm your decision
- Wait for the wiping process to come to an end
That’s it, after the wiping process completes, your iPhone should restart all brand-new and without any of your old data on it. It’s worth mentioning that you can also trigger the wiping process remotely from a desktop computer.
If you’re worried about third-party tools being able to recover data you wiped, rest assured; data on iOS devices is inherently protected using 256-bit encryption, and the keys are destroyed once your data is wiped from your device.
Therefore, even if someone were to be able to recover your old iPhone data, it would be inaccessible thanks to the encryption used to protect it.
Erase iPhone Guide – CONCLUSION
To sum it up, although wiping your iPhone is itself a quick, intuitive operation, there are many things you’ll need to take into consideration based on what you’re planning to do with the device you’re trying to wipe.
If you plan on selling the device or just giving it away, you’re going to want to remove all personal data that ties you to the device, disable any security components such as the device locator and iCloud, as well as unpair any additional devices you’ve connected to it.
On the other hand, if you plan on wiping your device just because you want a fresh start and don’t really care about the data you’re about to throw into oblivion, you can just go ahead and perform the factory reset without any additional process we’ve described in our guide.