Splitgate is a PVP game that the developer says is “Halo meets Portal.” In the game, users can portal with a portal gun while defeating enemies with various weapons. The game is in Beta, so it can be unstable. However, it is free to play. Here’s how to enjoy Splitgate on Linux!

Splitgate is a new FPS game that takes the concept of Valve’s Portal and Microsoft’s Halo and puts them together. It’s a fun game, and thankfully, you’ll be able to enjoy it on Linux. That said, you’ll only be able to play the game on Steam for Linux, so we’ll need to demonstrate how to install it.
To start the installation of Steam on Linux, open up a terminal window on the desktop. To do that, press Ctrl + Alt + T on the keyboard. Or, search for “Terminal” in the app menu and launch it that way.
With the terminal window open and ready to use, the installation can begin. Follow the installation instructions down below to get Steam working on the desktop.
Ubuntu
To install Steam on Ubuntu, you’ll need to use the following apt install command down below.
sudo apt install steam
Debian
Steam is available on Debian. However, you’ll have to get the DEB package from the Valve website and download it to your home folder using the wget command down below.
wget https://steamcdn-a.akamaihd.net/client/installer/steam.deb
After downloading the Steam DEB package to your computer, the installation can begin. Using the dpkg command down below, install the latest release of Steam for Debian.
sudo dpkg -i steam.deb
Now that the Steam DEB package is configured on your Linux PC, you’ll have to correct any dependency issues on the system. Using the apt-get install command down below, correct the dependencies.
sudo apt-get install -f
Arch Linux
Arch Linux has Steam available in the “multilib” software repository. However, you’ll need to enable this software repository on your computer. To do that, open up the /etc/pacman.conf file (as root).
Now that the file is open as root locate the # symbol near “multilib” in the text file and remove it. Then, remove the # symbols from directly below it. Finally, save the text file and re-sync Pacman with the official software repositories.
sudo pacman -Syy
Finally, install the Steam application on your Arch Linux system using the following pacman command below.
sudo pacman -S steam
Fedora/OpenSUSE
With Fedora and OpenSUSE, it is possible to get Steam working through the software repositories included on the system. That being said, the Flatpak release of Steam works much better on these operating systems, and we suggest setting it up instead.
Flatpak
To get Steam working on your PC as a Flatpak, you’ll have to set up the Flatpak runtime on your computer. Thankfully, the Flatpak runtime can easily be set up by following our setup guide.
After configuring the Flatpak runtime, the installation of Steam can begin. First, using the two commands below, get the latest Steam app working on your system.
flatpak remote-add --if-not-exists flathub https://flathub.org/repo/flathub.flatpakrepo
flatpak install flathub com.valvesoftware.Steam
Now that Steam is installed open up Steam on your computer and log into your account using your password details. Then, follow the step-by-step instructions down below to get Splitgate working on Linux.
Step 1: To get Splitgate working, find the “store” button and click on it with the mouse. Inside the Steam store, find the search box and click on it with the mouse. Then, type in “Splitgate (Beta).”
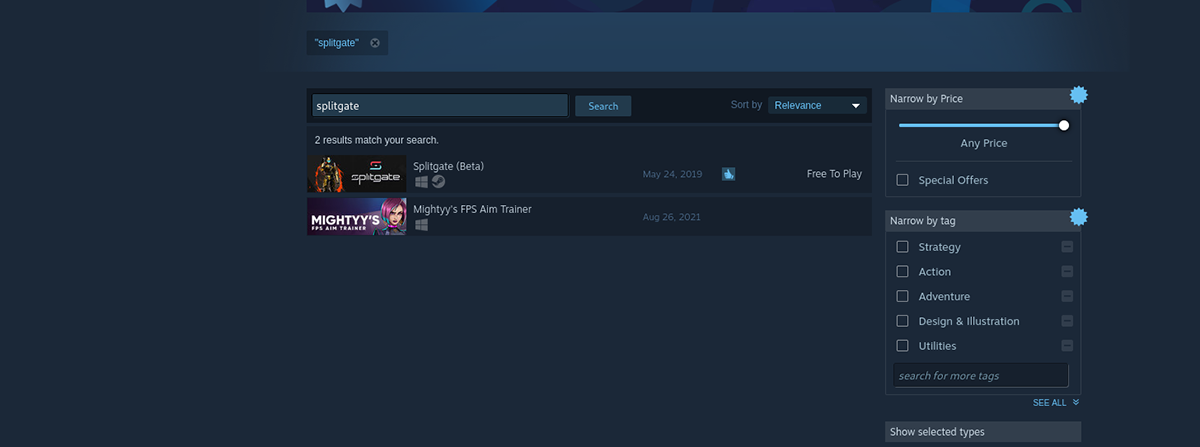
Press the Enter key to view the search results. Then, look through the search results and click on “Splitgate.” Selecting this option will load up the game’s Steam Store page.
Step 2: Locate the green “Add to cart” button and click on it with the mouse. When you select this button, you’ll add the game to your Steam cart. Then, click on the cart button to go through the process of purchasing the game for your Steam account.

Step 3: Find the “Library” button in Steam and click on it with the mouse to access your game in your Steam library collection. Then, find the search box in the Steam library section, and type in “Splitgate.”
Locate “Splitgate” and click on it to access the game’s Steam library page.
Step 4: On the Splitgate library page, find the blue “INSTALL” button, and click on it with the mouse. When you select this button, the game will begin to download. Keep in mind that this download may take some time.

The blue “INSTALL” button will become a green “PLAY” button when the download is complete. Select it with the mouse to start up Splitgate.
Enjoy, and happy gaming!