Need to install GCC on your Ubuntu system but can’t figure out how to set it up? If so, this guide is for you! Follow along below as we show you how to install GCC on Ubuntu!
Install GCC on Ubuntu – Terminal
The GCC (GNU Compiler Collection) is installable on Ubuntu through the command-line terminal. To install it, you will need to download and set up the “build-essential” package on Ubuntu. To start the installation process, open up a terminal window.
To open up a terminal window on the desktop, press Ctrl + Alt + T on the keyboard. Or, open up the app menu and search for “Terminal” to open it up.
Once the terminal window is open, make use of the apt install command below and use it to install the “build-essential” package on Ubuntu.
sudo apt install build-essential
After entering the command above, Ubuntu will ask you for your password. Your password is requested due to the sudo command. This command allows users to execute a single command as root. To continue, enter your user password.
Note: while entering your password with sudo, you will not see any password feedback. If this bothers you, please follow along with our guide on how to turn on password feedback.
When you’ve entered your password, the terminal prompt will collect all dependencies related to the “build-essential” package. From there, Ubuntu will ask you if you want to install the package. Press the Y key to continue.
Once the Y key is pressed, Ubuntu will start installing GCC on your computer. This process shouldn’t take long at all. When the process is complete, you can view the GCC manual with the man gcc command.
Installing multiple versions of GCC – Terminal
While installing the “build-essential” package on Ubuntu is good enough for most Ubuntu users, as it is GCC 10, it’s not the only version of GCC you can install. If you’d like to install multiple versions of GCC on Ubuntu, you can. Here’s how.
First, open up a terminal window on the Ubuntu desktop. Once it is open, use the apt search command to search the available GCC packages in the Ubuntu software repositories.
apt search gcc
Look through the prompt and find the version of GCC you’d like to install on Ubuntu. As of now, it is possible to install GCC 7, GCC 8, 9, and 10 (which is installed via the “build-essential” package).
Note: can’t find the GCC version you want through the apt search results?
Once you’ve located the version of GCC you’d like to install on your Ubuntu PC, install it using the apt install commands below. GCC packages are gcc-7, gcc-8, gcc-9, and gcc-10.
To install GCC version 7 on Ubuntu, install both the gcc-7 and g++-7 packages.
sudo apt install gcc-7 g++-7
To install the GCC version 8 on Ubuntu, install both the gcc-8 and g++-8 packages.
sudo apt install gcc-8 g++-8
Need to get GCC version 9 on your computer? Install the gcc-9 and g++-9 packages.
sudo apt install gcc-9 g++-9
While it’s highly recommended you install the “build-essential” package to get GCC 10 working on Ubuntu, that’s not the only way to install it on your computer. You can also install GCC 10 by installing the gcc-10 and g++-10 packages.
sudo apt install gcc-10 g++-10
Install GCC on Ubuntu – Synaptic Package Manager
If you need to get GCC working on Ubuntu but don’t want to use the terminal, you can do it with the Synaptic Package Manager. To start, ensure you have Synaptic installed. To install Synaptic, open up the Ubuntu Software app, search for “Synaptic,” and install it.
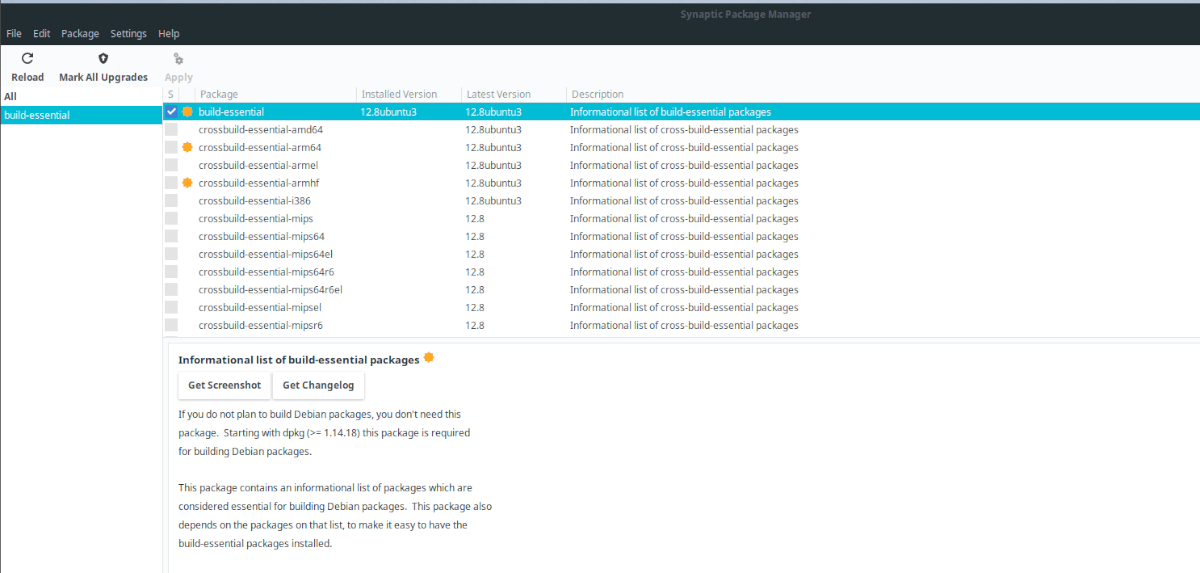
Once the Synaptic Package Manager is installed, open it by searching for it in the app menu. Then, locate the search button in the top-right corner of the screen. After selecting the Synaptic search button, type out “build-essential” and press the Enter key to view the search results.
Look through the search results in Synaptic for “build-essential.” When you’ve found it, right-click on it with the mouse and select the “Mark for installation” button to mark the “build-essential” package for installation in Synaptic.
Find the “Apply” button in Synaptic, and click on it to start the installation of GCC on Ubuntu.
Installing multiple versions of GCC – Synaptic Package Manager
Need to install a different GCC version to Ubuntu rather than the one provided with the “build-essential” package? Do the following. First, open up Synaptic Package Manager.
Once Synaptic is open, find the search button, and click on it with the mouse. Then, choose one of the packages listed below and type them into the search box.

- GCC 7: gcc-7, g++-7
- GCC 8: gcc-8, g++-8
- GCC 9: gcc-9, g++-9
- GCC 10: gcc-10, g++-10
Right-click on the GCC package(s) you’ve searched for in Synaptic, and select the “Apply” button to install it. Repeat this process to install as many versions of GCC to Ubuntu as desired.