TarGZ archives are a staple of Linux. Many programs are distributed in this file format, as well as other files. Despite this, many Linux users do not know how to unzip TarGZ files in Linux.
In this guide, we’ll show you that it’s effortless to unzip TarGZ files on Linux. To get started, download your favorite TarGZ file and follow along!
Unzip TarGZ files with Gnome file manager
If you use the Gnome desktop environment, you also use the Gnome file manager. It is known as “Files,” and it has a built-in ability to decompress and extract TarGZ archive files. Here’s how to do it.
First, launch the Gnome file manager. You can do this by pressing the Win key on the keyboard to open up the search area. Inside the search box, type in “Files” and select the file manager icon.
Once inside of files, locate the TarGZ archive file you wish to extract. In this example, our TarGZ file is in the “home” directory. After you’ve found your TarGZ file, select it with the mouse.
With the TarGZ archive file selected with the mouse, right-click on it to open up the right-click menu. Inside the right-click menu, there are many options to choose from. Look through for the “Extract Here” option, and click on it.

Upon clicking on the “Extract here” button, the Gnome file manager will decompress and then extract your TarGZ archive file in the same folder that the TarGZ archive is located in.
From here, you can access the contents of your TarGZ archive now that they are extracted. Be sure to repeat this process when you wish to decompress a TarGZ file on the Gnome desktop.
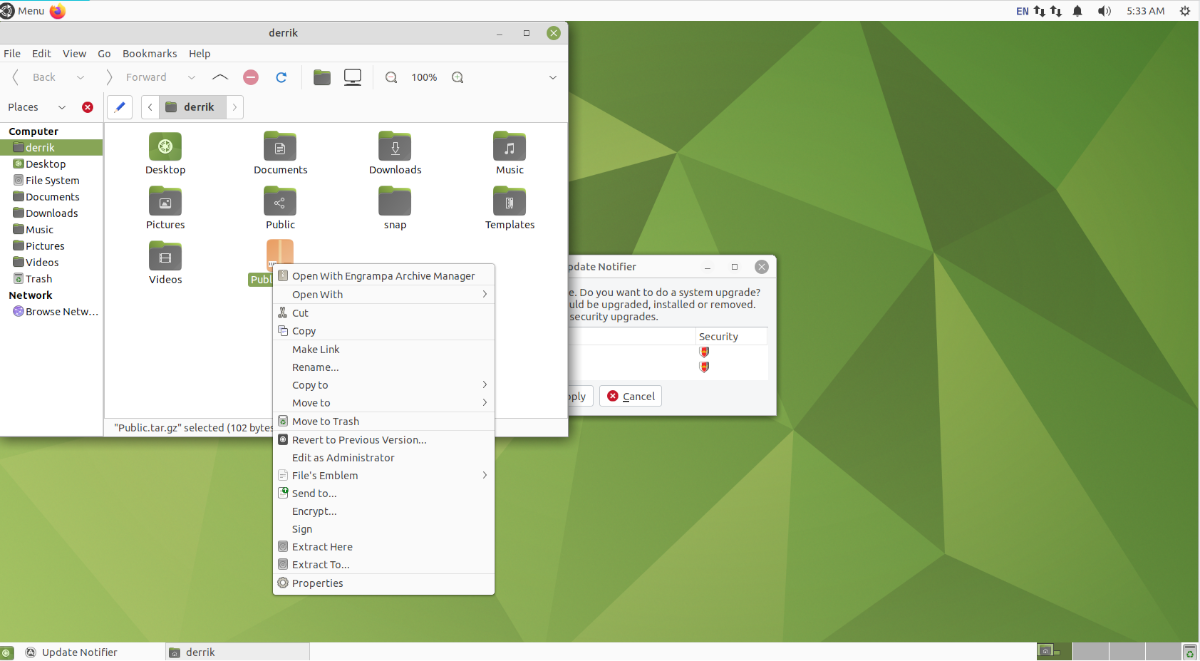
Unzip TarGZ files with KDE Plasma file manager
On KDE Plasma 5, the Dolphin file manager is used. Dolphin is excellent, and one of the reasons it is well-loved in the community is it is packed full of features. One of the wonderful features it includes is the ability to extract the contents of TarGZ archive files right from the file manager.
If you’d like to decompress a TarGZ file within the Dolphin file manager in KDE Plasma 5, start by launching the file manager. You can launch the Dolphin file manager by opening up the KDE app menu and searching for “Dolphin.”
Once the Dolphin file manager is open, browse to where your TarGZ archive file is located on your computer. In this example, our TarGZ file is in the “home” directory. After browsing to the folder where the TarGZ file is, select it with the mouse.
Upon selecting the TarGZ archive file with your mouse, right-click on it. By right-clicking on it, you will bring up the right-click menu. From here, look through the right-click menu and find the “Extract” menu, and select it with the mouse.
Inside the “Extract” menu, you can choose from “Extract archive here,” “Extract archive to,” or “Extract archive here, autodetect subfolder.” Choose one of the options that suit your use case best to decompress the TarGZ archive file.

Once the TarGZ archive is extracted, you’ll be able to make use of the contents of your TarGZ archive in KDE Plasma 5. Be sure to repeat this process each time you need to decompress a TarGZ file on KDE.
Unzip TarGZ files in XFCE
If you’re using XFCE and need to extract a TarGZ archive file, you’ll need to deal with the Thunar file manager. To start, open up the Thunar file manager on the XFCE desktop. To do that, click on the home folder on the desktop, or search for “Thunar” in the app menu.
Once it is open, go to the location of your TarGZ archive file. In this example, the TarGZ archive file is in the “home” directory. From here, select the archive with the mouse. Then, right-click on it to open up the right-click menu.
Inside the right-click menu, select the “Extract Here” option. Selecting this option will allow the Thunar file manager to instantly decompress the contents of your TarGZ archive file to the folder the file is located in.
When the decompression is finished, you’ll be able to access the decompressed files. Be sure to repeat this process on XFCE each time you need to unzip a TarGZ archive.
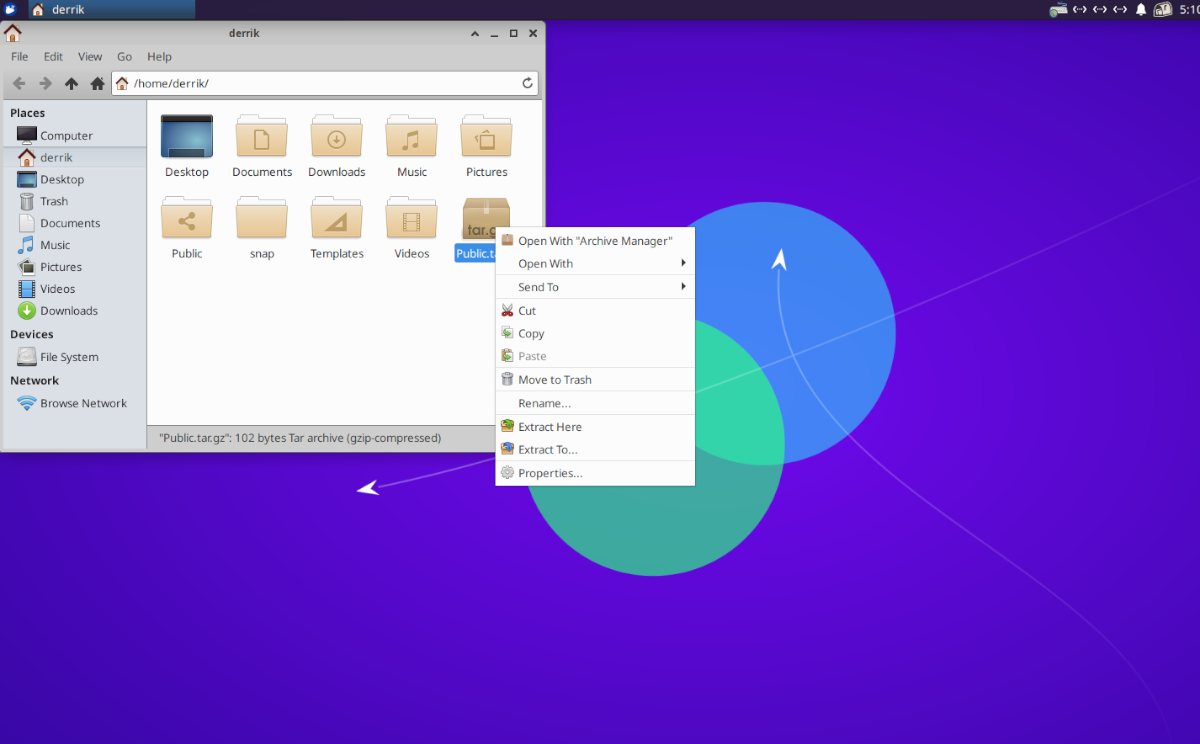
Unzip TarGZ files in MATE
Those on the Mate desktop that need to unzip a TarGZ file will need to make use of the Caja file manager. This file manager, like all Linux file managers, has support for decompressing Tar archives built-in. Here’s how to do it.
To start, open up the Caja file manager. You can do this by clicking on the home folder on the desktop or by searching for the file manager in the app menu. From here, go to the folder in which the TarGZ file is located. In this example, it is the “home” folder.
Once in the location of the TarGZ archive, select it with the mouse. Then, right-click on it with the mouse to open up the right-click menu. In this menu, find the “Extract Here” option, and select it. When you choose this option, the TarGZ archive will decompress.
After everything is decompressed, you’ll have access to the contents inside of the TarGZ file in Mate. Be sure to repeat this process each time you wish to extract a TarGZ archive in Mate.
Unzip TarGZ files with the terminal
If you don’t want to deal with the file manager, it’s also possible to extract via the command line. To start, open up a terminal window by pressing Ctrl + Alt + T on the keyboard.
With the terminal open, use the command below to extract it.
tar xvf /home/USERNAME/location/of/tar/archive/my-archive.tar.gz